Preamble
These instructions explain how to create a bootable USB stick to install openSUSE from the LiveCD isos or from the DVD (which were originally intended for optical media). The procedure is different for CD and DVD image for versions before 12.2.
However, for 12.2 or later, the instructions are the same for the CDs or the DVD. Note: do not try to apply procedures found in internet for other distributions "to convert the images into bootable sticks". Doing that will break the images. The openSUSE images are already prepared for being used directly on usb sticks, no further steps are needed.
[edit]Create a Live USB (GUI)
[edit]Download LiveCD ISO
[edit]Before 12.2
You'll need to look at the USB DVD section below if you don't want to install from a LiveCD image.
[edit]12.2 or later
These instructions apply both to the CDs or the DVD
[edit]Windows Instructions
 |
Download ImageWriter
Write ISO to USB
Write the LiveCD to the USB stick.
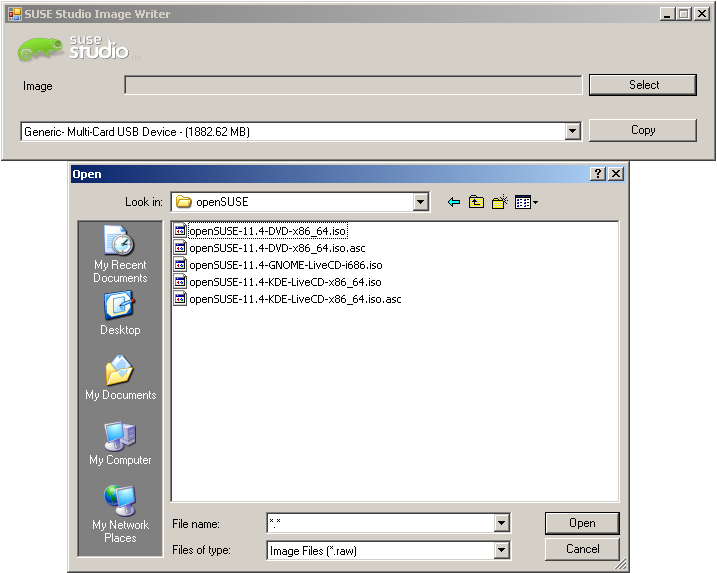
NOTE: Windows Imagewriter.exe, unlike Linux version, does not see automatically .iso files, only .raw, but it works with any of those files without problems. That leads to manual selection described below.
- Open the downloaded ImageWriter
- If the ImageWriter won't open, you'll probably need to download the .NET 2.0 Runtime
- If you get an error right after you start the process, you may want to right-click the executable and "Run as administrator".
- Press the select button
- Type
*.* in the file name box and find your LiveCD image
- Select your USB stick and click the Write button
NOTE: You may meet this error on some MS Windows versions:
[edit]Linux Instructions
|
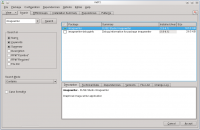 |
Install ImageWriter
Install the SUSE Studio Image Writer.
- Open the YaST software management module.
- In KDE, open the kicker menu, go to the Computer tab, and click Install/Remove Software
- In GNOME, you should see Install/Remove Software on the right-hand side of Computer menu
- You will be prompted for the root password, enter it
- Search for "imagewriter" (excluding the quotes) and check it to be installed
- Click Accept
|
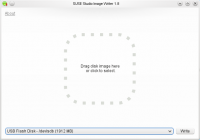 |
Write ISO to USB
Write the LiveCD image to the USB stick
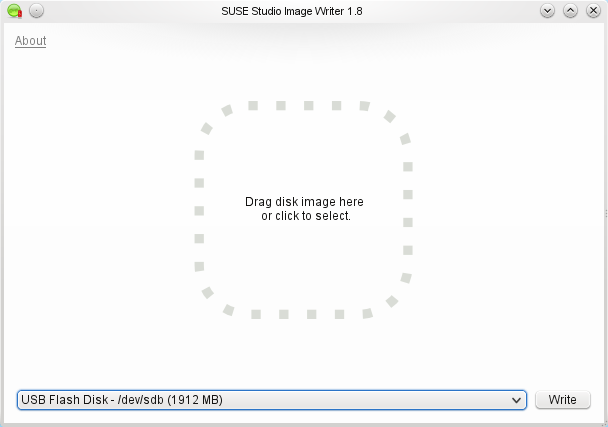
- Open the ImageWriter
- In KDE, open the kicker menu, search for "imagewriter", and click SUSE Studio Imagewriter
- In GNOME, you'll click More Applications, search for imagewriter, and click on SUSE Studio Imagewriter
- Enter the root password when prompted
- Click in the middle of the application, and navigate to where you saved your image
- Select your USB device from the dropdown menu, and click the Write button
- Reboot
|
[edit]Create a Live USB (console)
[edit]Download and verify LiveCD ISO
Download the installation image of your choice from:
~> aria2c -x5 http://download.opensuse.org/distribution/12.2/iso/openSUSE-12.2-KDE-LiveCD-x86_64.iso
Verify a download integrity:
~> gpg --recv-keys 9C800ACA
~> wget http://download.opensuse.org/distribution/12.2/iso/openSUSE-12.2-KDE-LiveCD-x86_64.iso.asc
~> gpg -a openSUSE-12.2-KDE-LiveCD-x86_64.iso.asc
 |
Linux Instructions
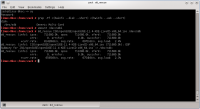
Find Block Device
After inserting your USB stick, you can find out what device it is
~> su
# grep -Ff <(hwinfo --disk --short) <(hwinfo --usb --short)
Write ISO to USB
Finally, once you've found your block device, write the image to it. Point 'dd' to the full path such as '/home/user/Downloads/openSUSE-12.2-KDE-LiveCD-x86_64.iso' or change directory (example: cd ./Downloads) to where the image is contained.
# umount /dev/sdX
# dd if=/path/to/downloaded.iso of=/dev/sdX
Alternate method to write ISO to USB
As above, but using "cp" instead of "dd".
# umount /dev/sdX
# cp /path/to/downloaded.iso /dev/sdX
# sync
Put ISO on vfat partitioned USB stick or hard disk
If you'd rather not reformat the USB device and keep the ability of putting files on it and accessible by other operating systems, you have the option of using the live-fat-stick script.
On openSUSE you can install the package via 1-click, if you are running any other distribution, get the script from here and make it executable(as root, with chmod +x /usr/bin/live-fat-stick) after copying it to /usr/bin/, make sure you have syslinux and gpart installed before running it.
Run the following as root (with su -, not using sudo) in terminal:
# live-fat-stick -l
to get the USB device path
# live-fat-stick --suse /path/to/openSUSE-filename.iso /dev/sdXY
to copy iso to USB device and make it bootable
# live-fat-stick -h
it shows help.
Multiple iso images from multiple distributions can be added to the USB device, boot menu will offer a choice of distribution to boot from. Scripts does not format or remove data from the device.
|
| 200px |
OS X instructions
Find Block Device
Plug-in your USB stick and find what "/dev/diskN" it is mapped to by opening Terminal (where "N" stands for "disk0", "disk1", "disk2" etc). To do so, please execute:
# diskutil list
This will print out the list of currently mapped devices/partitions. Find the USB using "NAME" column. Then note the corresponding /dev/diskN, where "N" is for index of your disk. For example:
/dev/disk2
   #:                       TYPE        NAME                    SIZE   IDENTIFIER
   0:                       FAT32                               2.0 GB   disk0
   1:                                   USB2                    2.0 GB   disk0s1
In this case "/dev/disk2" is the one we want.
Unmount USB Stick
Unmount the USB stick
# diskutil unmountDisk /dev/diskN
Where /dev/diskN is the one you have found in previous step as per our example it would be "/dev/disk2".
Write ISO to USB
Write the content of the ISO file:
# dd if=/path/to/downloaded.iso of=/dev/diskN bs=4k
Again the /dev/diskN is the same one you have found previously. You will be prompted for the administrator's password.
|
[edit]Bootable USB from DVD or Net-install
These instructions apply only to versions prior to 12.2. From this version onwards, simply do the same as for the CD images as explained above. Specifically, do not run the isohybrid steps.
[edit]Download DVD ISO
 |
Linux instructions
Install syslinux/isohybrid
If you would like to boot the from a USB stick then you can make the ISO bootable by installing syslinux. # zypper in syslinux
# isohybrid openSUSE-12.1-DVD-x86_64.iso
Once completed just follow whichever set of above LiveUSB instructions you like, and take care to read the Booting from USB-DVD section below afterward.
|
 |
Windows instructions
Get isohybrid
Download and extract isohybrid from the syslinux package.
- Download syslinux.
- Extract the zip. Right click on it in Windows Explorer and click "Extract All"
- Find the isohybrid.pl script in the utils directory, and place it in the same directory as your image.
[edit]Install Perl
|
 |
Create Hybrid ISO
Make the DVD or Net-install image hybrid.
- Open cmd and navigate to the directory containing isohybrid.pl script and your installation image.
- Run isohybrid.pl
> C:\strawberry\perl\bin\perl.exe isohybrid.pl openSUSE-12.1-DVD-x86_64.iso
- This should take less than a second to execute
Once completed just follow whichever set of above LiveUSB instructions you like, and take care to read the Booting from USB-DVD section below afterward.
|
 |
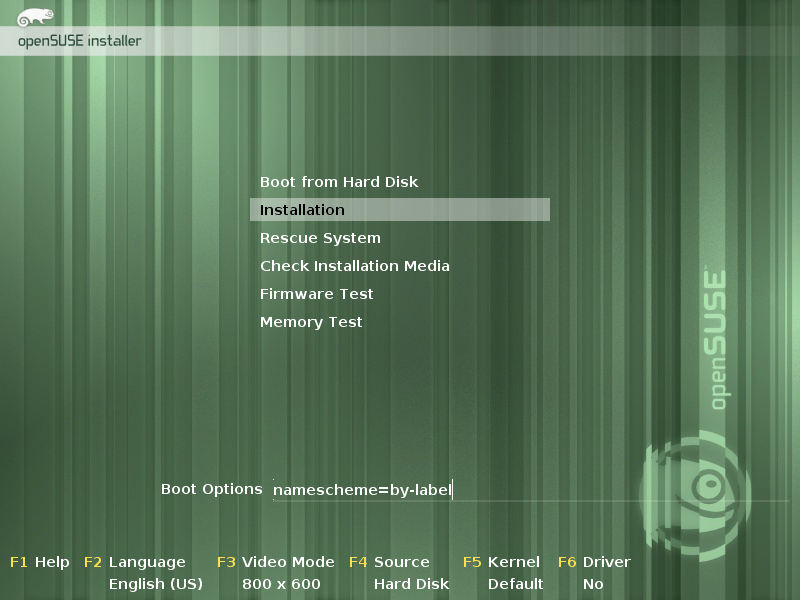
Booting from USB-DVD
Write the image to the USB stick using the Windows instructions above.
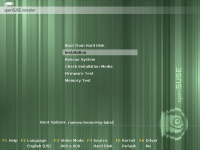
- Hit F4, change the installation source to Hard Drive, but leave all fields blank and hit Enter to close the dialog.
- Type "namescheme=by-label" into the boot options for "Installation" and start the installation; you should go straight to the installer without a hitch.
|
[edit]How to make a USB drive bootable
This situation would happen very rarely, but in the even that your computer doesn't boot from the LiveUSB/DVD from the steps above, you might try the following procedure.
 |
Linux Instructions
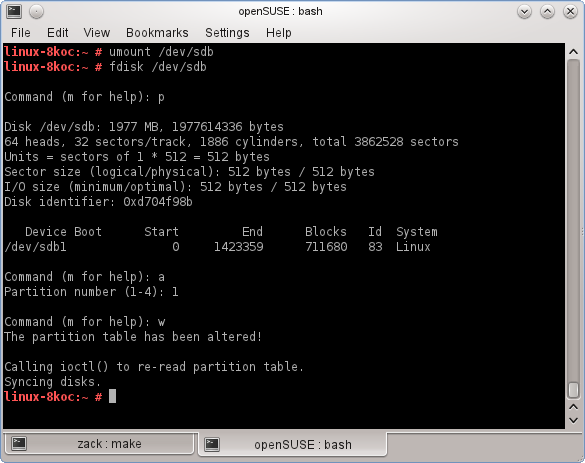
Open a console and do the following as root
# umount /dev/sdX
# fdisk /dev/sdX
: p   «--- print partition table
: a   «--- activate partition (bootable)
: 1   «--- apply to partition 1
: w   «--- write changes and exit
|
 |
Windows Instructions
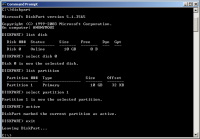
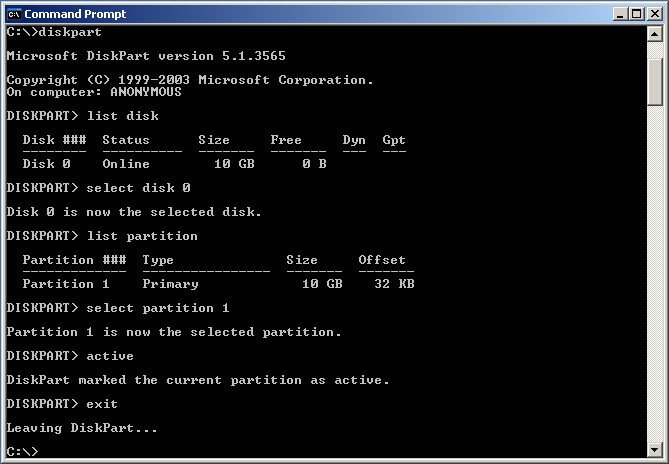
The Windows equivalent of the above would look like this
C:\> diskpart
DISKPART> list disk           «--- print disks
DISKPART> select disk 0       «--- select disk number
DISKPART> list partition      «--- print partition table
DISKPART> select partition 1  «--- select the first partition
DISKPART> active              «--- activate disk/partition (bootable)
DISKPART> exit                «--- exit
Unlike fdisk, diskpart will preform changes as you enter them, therefore, there is no write instruction.
|
[edit]Live USB stick with persistent file system
To create a persistent file system on the usb stick give at the initial boot prompt the extra command:
kiwi_hybridpersistent=yes
Now an extra file system will be created so that data can be stored on the stick in a persistent way.
Note that this only makes sense if your USB stick is larger than 1 GB.
[edit]How to recover the USB stick for "normal" use again
After system installation, you may want to reuse the stick as you would normally to write things on it. In that case you have to reformat it. Often people complain that Windows fails to do it.
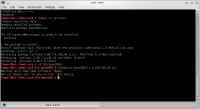
If you look at the 12.3 DVD image on a USB stick wit fdisk, you would see something like this (notice the GPT warning):
Telcontar:~ # fdisk -l /dev/sdf
·
WARNING: GPT (GUID Partition Table) detected on '/dev/sdf'! The util fdisk doesn't support GPT. Use GNU Parted.
·
·
Disk /dev/sdf: 7742 MB, 7742685184 bytes
64 heads, 32 sectors/track, 7384 cylinders, total 15122432 sectors
Units = sectors of 1 * 512 = 512 bytes
Sector size (logical/physical): 512 bytes / 512 bytes
I/O size (minimum/optimal): 512 bytes / 512 bytes
Disk identifier: 0x1bf0d4df
·
   Device Boot      Start         End      Blocks   Id  System
/dev/sdf1            4248       12439        4096   ef  EFI (FAT-12/16/32)
/dev/sdf2   *       12440     9162751     4575156   17  Hidden HPFS/NTFS
Telcontar:~ #
So, before reformatting, you have to repartition it again. And sometimes, if this fails, you may need an extra step - because software thinks the stick is a CD and thus not writeable:
Notice: all these intructions assume the stick device is /dev/sdX. You have to find which is yours (see “Find Block Device” section above). An error here will destroy some other disk in your system.
  # umount /dev/sdX
  # dd if=/dev/zero of=/dev/sdX count=100
That destroys the boot sector, partition table, and initial structures. Any operating system should be happy to reformat it again.
But typically, you would simply start fdisk:
# fdisk /dev/sdX
and select:
o create a new empty DOS partition table
and then:
n add a new partition
(primary, number 1, default size to use the entire device)
t change a partition's system id
Use type 6, FAT16
w write table to disk and exit
Finally:
# mkfs.msdos -n SOME_NAME /dev/sdX1
And done. Or, you could use gparted for partitioning and formatting.
You could, if you prefer, make a backup image of the stick prior to using it for installation, with dd, and recover it after the installation.
 This tutorial is exclusively brought to you by AndroidCritics on Youtube visit youtube.com/androidcritics for the latest news,reviews, and more for your android device.Update Samsung Galaxy S3 To Official Android 4.2.2 Jelly Bean XXUFME3 Firmware


